其他專案 · Selected Work · 2025
Visual Odometry
3D Computer Vision 課程作業:用一支手機攝影機拍的連續影格, 手刻一套單目視覺里程計(Monocular VO)——相機校正、ORB 特徵追蹤、 Essential Matrix 估計與 recoverPose 姿態回復, 再用 Open3D 即時畫出相機在 3D 空間中的移動軌跡。Bonus 額外手刻了 Essential Matrix 估計、recoverPose 與 loop detection。
要解決的問題
這是「3D Computer Vision」課程的作業:給定一段連續影格(自己手機拍攝的影片),
在不用任何深度感測器、只靠單一相機影像的前提下,逐幀估計相機在 3D 空間中的相對運動,
累積成完整的移動軌跡——這正是 SfM(Structure from Motion) 與 SLAM 系統中
Visual Odometry 模組要解決的問題。作業分成三個階段:相機校正、逐幀 Tracking、3D 視覺化,
Bonus 則要求手刻 cv2.findEssentialMat、
cv2.recoverPose,
以及額外的 loop detection。
1. Camera Calibration
拍一段棋盤格從不同角度入鏡的校正影片,逐張偵測棋盤角點,用
cv2.calibrateCamera
解出相機內參矩陣(intrinsic matrix)K 與畸變係數(distortion coefficients)。
這一步是後續所有幾何計算的基礎——沒有精準的 K,Essential Matrix 與姿態估計都會系統性偏移。
python3.11 camera_calibration.py case1/calib_video_case1.avi --h 8 --w 6 --output camera_parameters_case1.npy

=> corners found in 6 images
=> Overall RMS re-projection error: 0.2584
Camera Intrinsic
[[493.99   0.    311.86]
 [  0.   494.08  187.33]
 [  0.     0.      1.  ]]
Distortion Coefficients
[[ 0.2264 -1.8418 -0.0031  0.0018  4.0550]]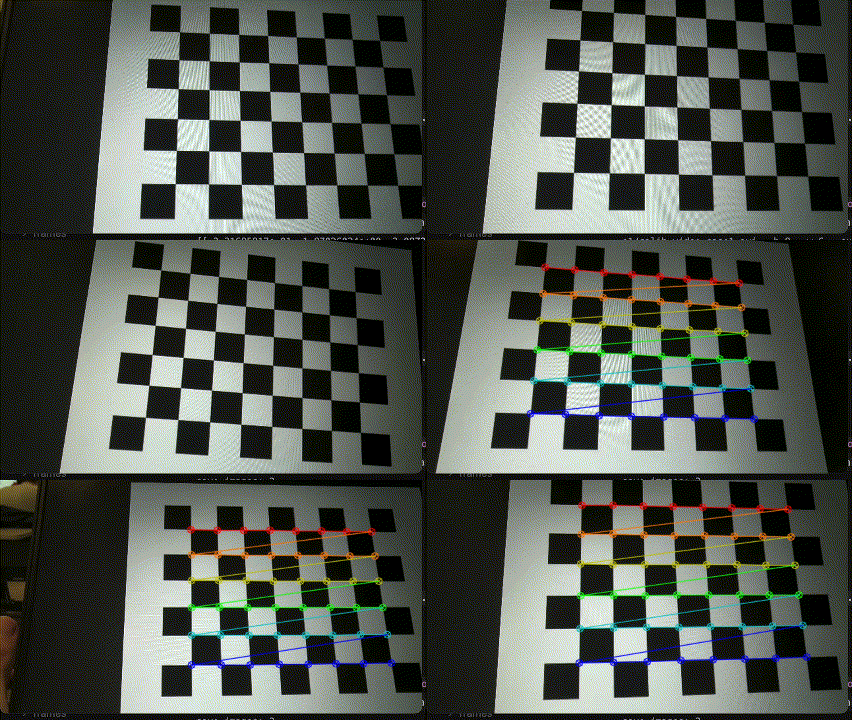
2. Tracking
逐幀處理:先用 ORB 找特徵點(比 SIFT 快很多,適合逐幀即時處理), 用 BFMatcher(Hamming distance)搭配 ratio test 配對相鄰兩幀, 再用相機內參與畸變係數對配對點做去畸變(undistort), 接著算出 Essential Matrix,最後用 recoverPose 回復出這一幀相對於上一幀的旋轉 R 與平移 t,累加到全域姿態上。
orb = cv.ORB_create(nfeatures=2000)
kp1, des1 = orb.detectAndCompute(img_prev, None)
kp2, des2 = orb.detectAndCompute(img, None)

bf = cv.BFMatcher(cv.NORM_HAMMING, crossCheck=False)
matches = bf.knnMatch(des1, des2, k=2)
good_matches = [m for m, n in matches if m.distance < 0.75 * n.distance]

# 去畸變(用校正得到的 K 與 dist)
points1 = cv.undistortPoints(pts1_distorted, self.K, self.dist, P=self.K)
points2 = cv.undistortPoints(pts2_distorted, self.K, self.dist, P=self.K)

# Essential Matrix
E, mask_E = cv.findEssentialMat(points1, points2, self.K,
                                 method=cv.RANSAC, prob=0.999, threshold=1.0)

# 從 E 回復出正確的 (R, t)
_, R_new, t_new, mask_pose = cv.recoverPose(E, points1, points2, self.K)

# 累積相機運動:新姿態 = 舊旋轉 × 新旋轉,舊平移 + 舊旋轉 × 新平移
t = t + R @ t_new
R = R @ R_new
recoverPose 在做什麼?Essential Matrix 做 SVD 分解後,數學上必定對應到
4 組可能的 (R, t) 解:(R₁,+t)、(R₁,−t)、(R₂,+t)、(R₂,−t),四組都滿足對極幾何方程式。
recoverPose
對這 4 組解分別做簡單三角化,檢查算出的 3D 點深度(Z 座標),
選出「讓大部分點都在兩台相機前方」的那一組——這個手性檢查(cheirality check)
就是為什麼 findEssentialMat
後面一定要接 recoverPose 的原因。
3. Result Visualization
用 Open3D 的 LineSet
畫出相機的視錐(frustum)形狀:定義中心點與四個角的 5 個頂點、8 條連接邊,
每一幀都用當前累積的 (R, t) 把這個視錐轉換到世界座標系並加進場景,
逐幀疊加後就形成一條連續的 3D 相機軌跡。
scale = 0.3
points = np.array([
    [0, 0, 0],                       # 相機中心
    [-scale, -scale, scale], [scale, -scale, scale],
    [scale, scale, scale], [-scale, scale, scale],   # 四個角
])
lines = np.array([[0,1],[0,2],[0,3],[0,4], [1,2],[2,3],[3,4],[4,1]])

points_world = (R @ points.T).T + t.T                # 轉換到世界座標

line_set = o3d.geometry.LineSet()
line_set.points = o3d.utility.Vector3dVector(points_world)
line_set.lines  = o3d.utility.Vector2iVector(lines)
vis.add_geometry(line_set)結果
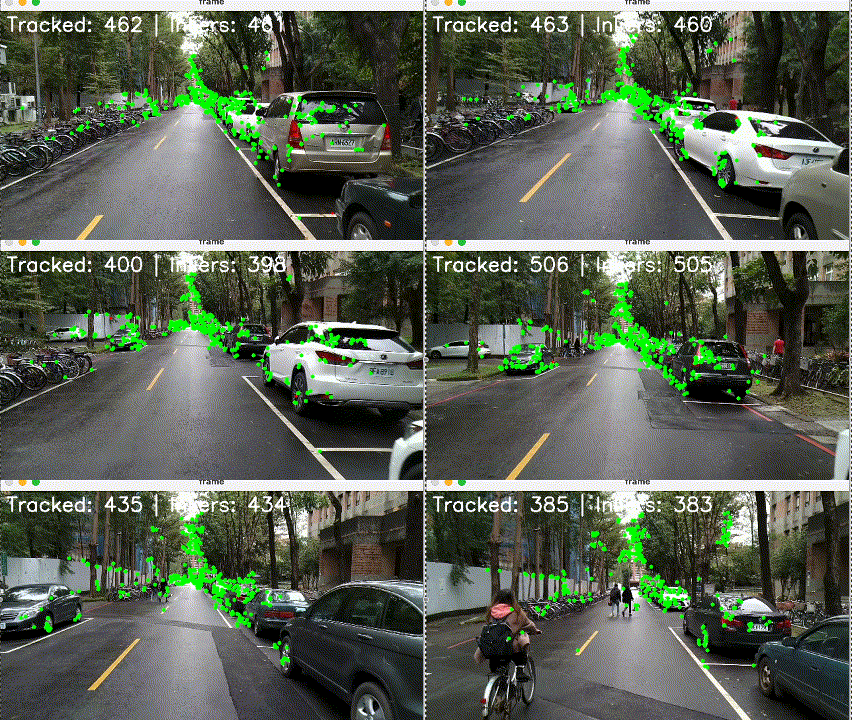
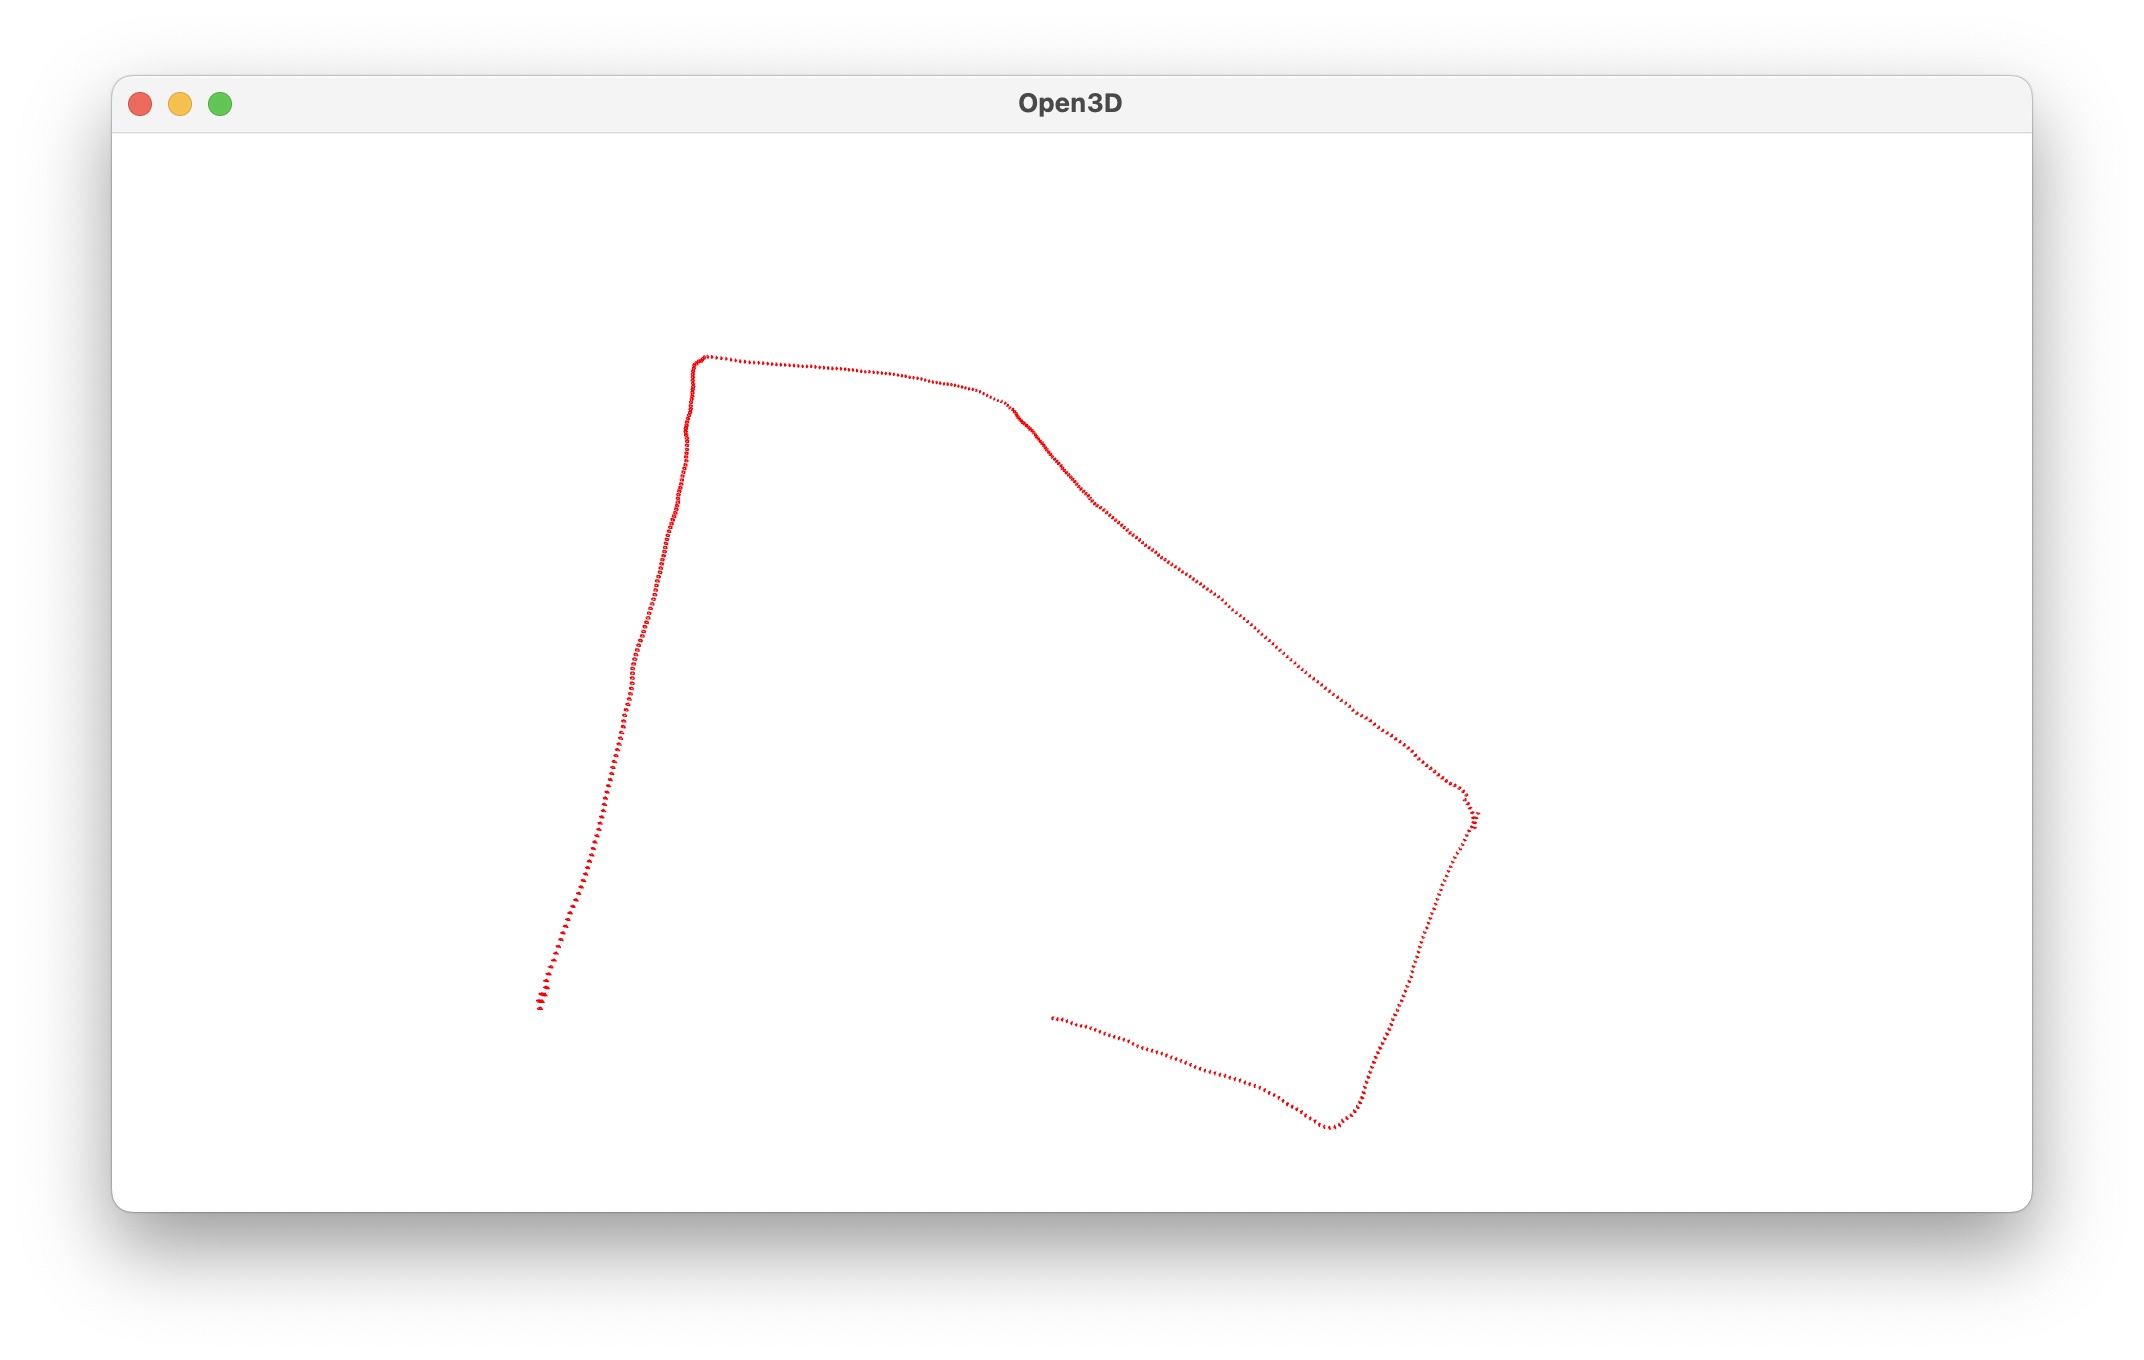
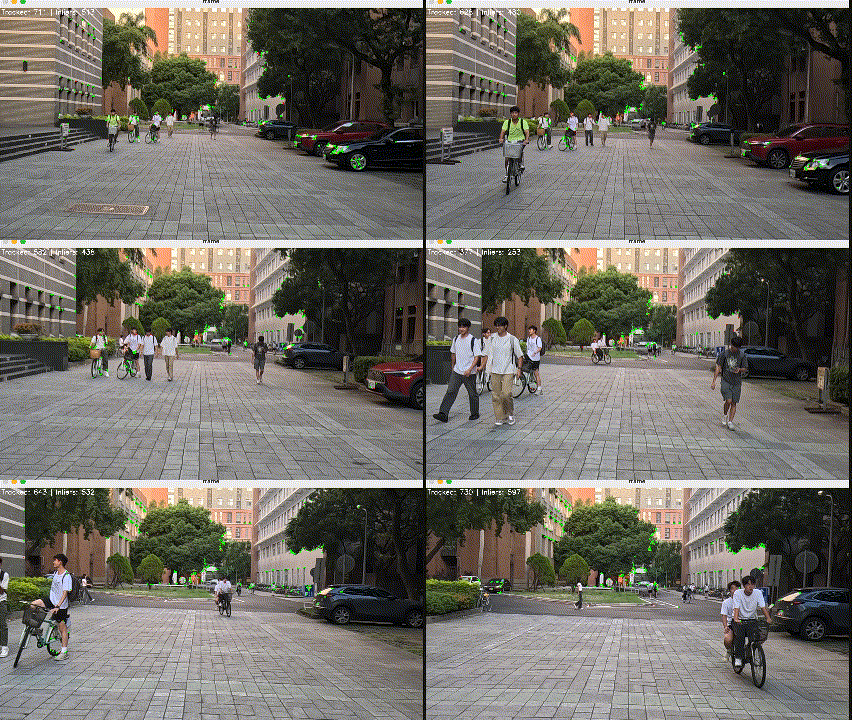
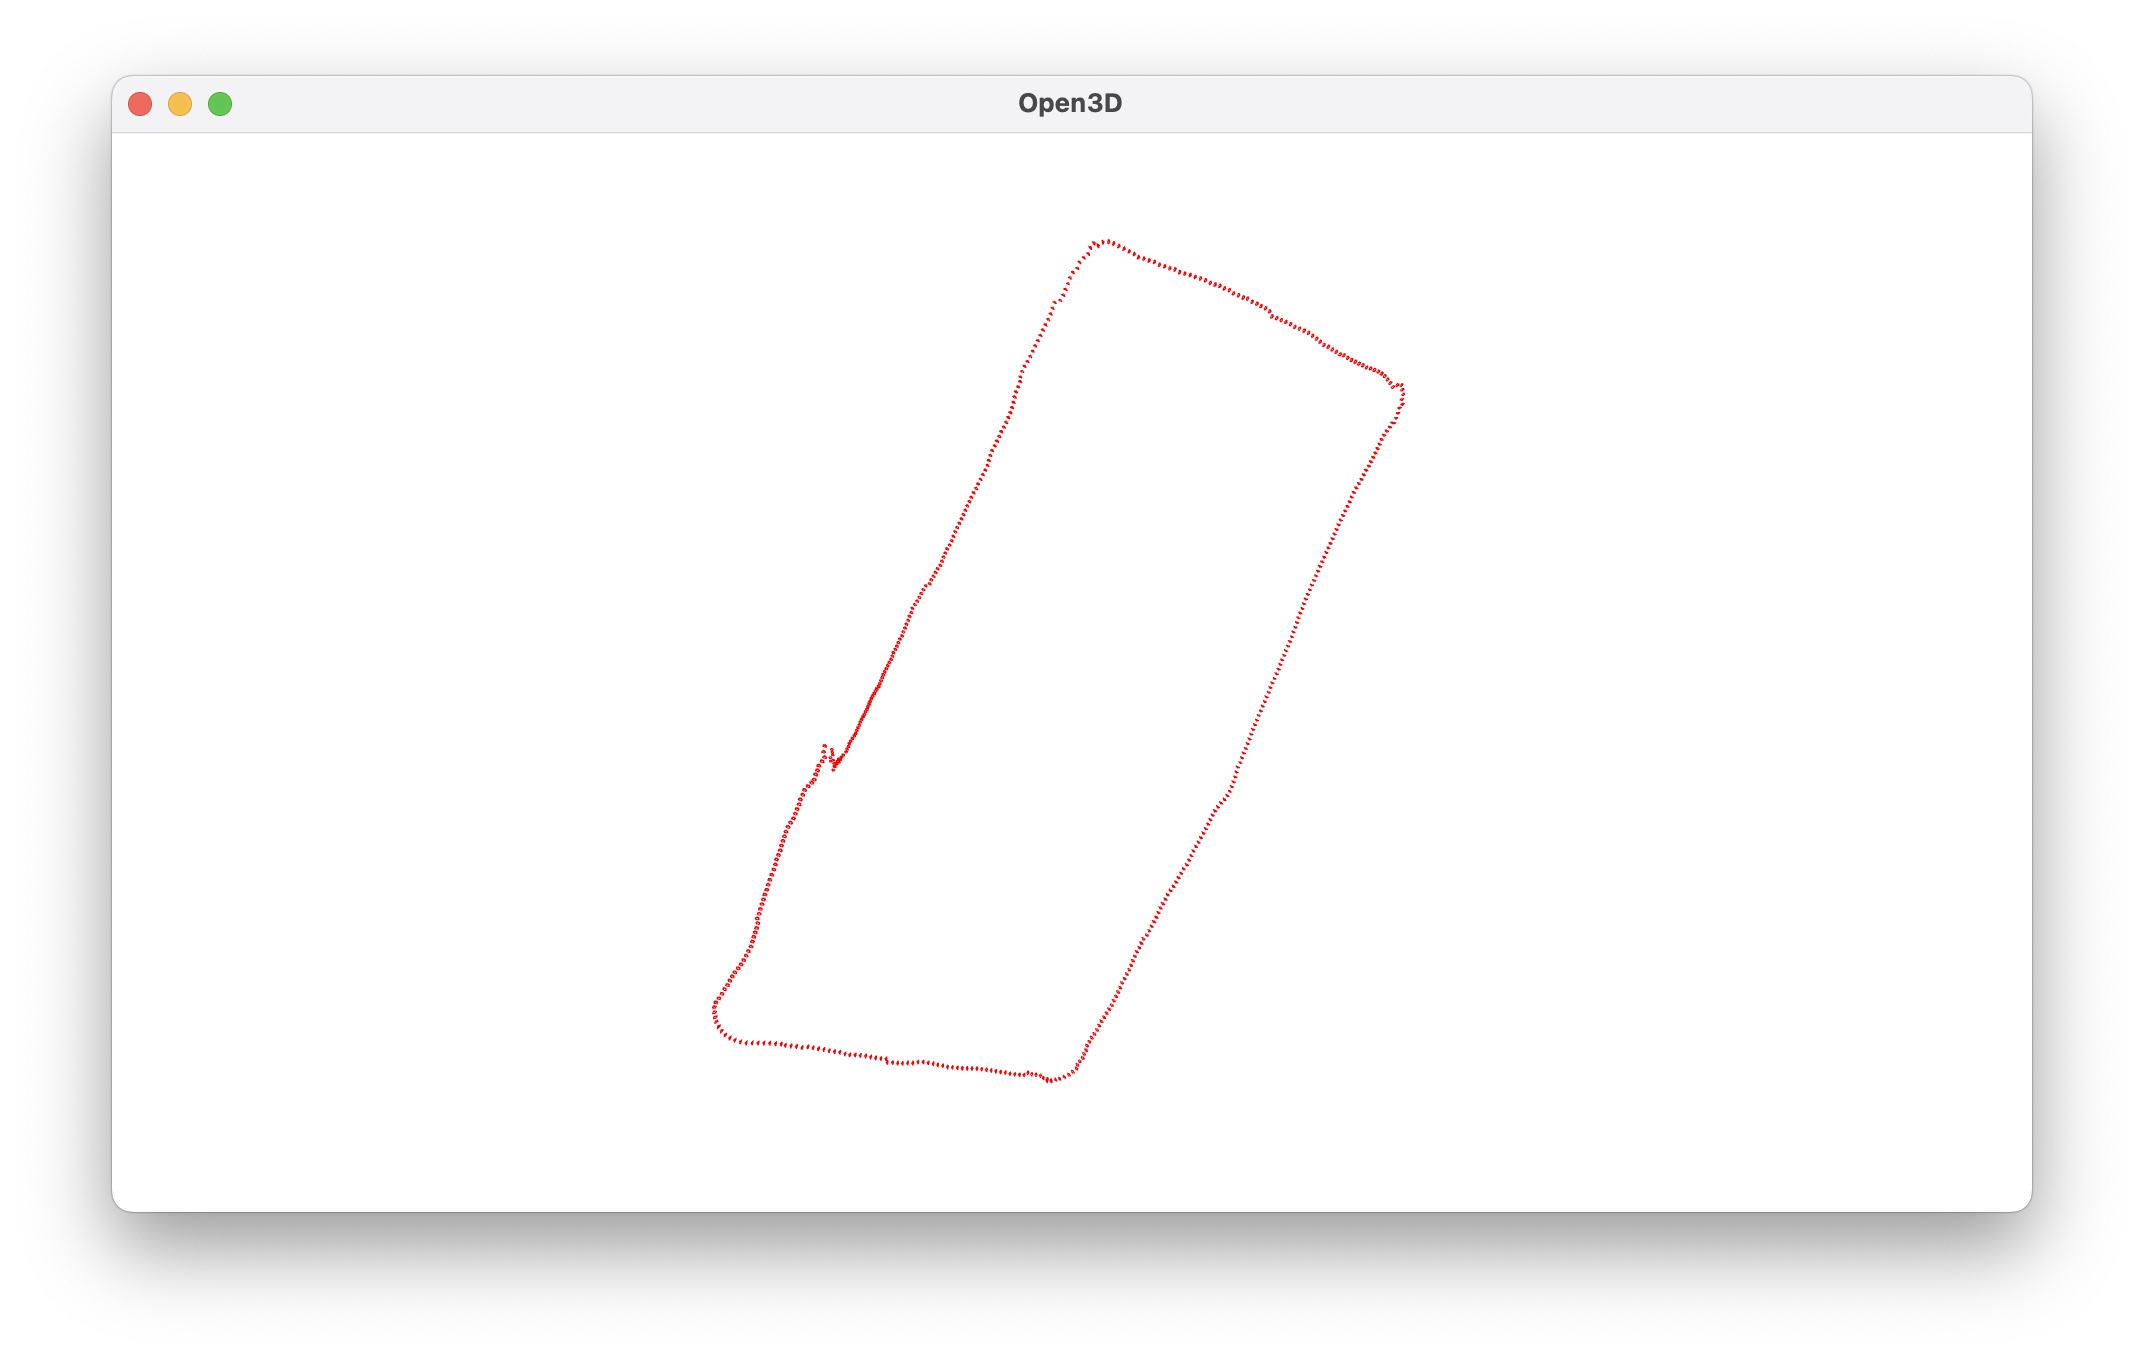
測了兩段自行拍攝的校園影片。畫面左上角即時顯示 Tracked / Inliers 數量, 綠色點是通過 Essential Matrix RANSAC 篩選後的內點特徵;右側則是 Open3D 即時累積出的 3D 相機軌跡(俯視角),Case 2 的路徑繞了一圈後回到接近起點的位置——這正是後面 loop detection 想要驗證的場景。
Bonus 1 & 2:手刻 Essential Matrix 與 recoverPose
不呼叫 OpenCV 內建函式,自己實作 8-point algorithm 估計 Essential Matrix: 先用內參把像素座標轉成相機歸一化座標,組出線性方程組後 SVD 求解, 再強制秩為 2(rank-2 constraint)讓結果符合 Essential Matrix 的數學性質; 搭配 Sampson error 當作 RANSAC 的內點判準,比單純的代數誤差更貼近真實幾何誤差。
def eight_point_E(x1, x2):
    # x1, x2: (N,2) 相機歸一化座標
    A = np.zeros((x1.shape[0], 9))
    A[:,0]=x2[:,0]*x1[:,0]; A[:,1]=x2[:,0]*x1[:,1]; A[:,2]=x2[:,0]
    A[:,3]=x2[:,1]*x1[:,0]; A[:,4]=x2[:,1]*x1[:,1]; A[:,5]=x2[:,1]
    A[:,6]=x1[:,0];         A[:,7]=x1[:,1];         A[:,8]=1.0

    _, _, Vt = np.linalg.svd(A)
    E = Vt[-1].reshape(3, 3)

    U, S, Vt = np.linalg.svd(E)                 # 強制 rank-2
    S[2] = 0.0
    return U @ np.diag(S) @ Vt

def sampson_error(E, x1n, x2n):
    x1h = np.hstack([x1n, np.ones((len(x1n), 1))])
    x2h = np.hstack([x2n, np.ones((len(x2n), 1))])
    Ex1  = (E @ x1h.T).T
    Etx2 = (E.T @ x2h.T).T
    num = np.sum(x2h * (E @ x1h.T).T, axis=1) ** 2
    denom = Ex1[:,0]**2 + Ex1[:,1]**2 + Etx2[:,0]**2 + Etx2[:,1]**2
    return num / np.clip(denom, 1e-12, np.inf)
recover_pose_custom()
則對 SVD 分解出的 4 組候選 (R, t) 逐一做線性三角化,
統計每組解讓多少點同時落在兩台相機前方(Z > 0),取 count 最高的一組作為最終姿態——
跟 OpenCV 內部的邏輯一致,只是自己刻了三角化與計數過程。
def recover_pose_custom(E, pts1_px, pts2_px, K, inlier_mask=None):
    x1n = normalize_points_with_K(pts1_px, K)
    x2n = normalize_points_with_K(pts2_px, K)

    R1, R2, tvec = decompose_essential(E)       # SVD 分解 E
    candidates = [(R1, tvec), (R1, -tvec), (R2, tvec), (R2, -tvec)]

    best_count, best_R, best_t = -1, None, None
    P0 = np.hstack([np.eye(3), np.zeros((3, 1))])

    for R_cand, t_cand in candidates:
        P1 = np.hstack([R_cand, t_cand.reshape(3, 1)])
        count_front = 0
        for x1, x2 in zip(x1n, x2n):
            X = triangulate_linear(P0, P1, x1, x2)[:3]   # 線性三角化
            if X[2] > 0 and (R_cand @ X + t_cand)[2] > 0:
                count_front += 1                          # 兩台相機前方都看得到
        if count_front > best_count:
            best_count, best_R, best_t = count_front, R_cand, t_cand.reshape(3, 1)

return best_count, best_R, best_tBonus 3:Loop Detection
Case 2 的軌跡最後繞回起點附近,代表相機看到了曾經看過的場景——這正是 loop detection 要抓的訊號。 做法分三步:
- 關鍵影格:每經過固定幀數挑一個關鍵影格,存下該幀的 inlier 特徵點與姿態
- 候選搜尋:新關鍵影格出現時,用 ORB 描述子跟資料庫裡「非最近幾幀」的關鍵影格做配對,快速篩出候選
- 幾何驗證:對候選重新做 Homography + RANSAC,inlier 數需超過門檻才判定為真正的 loop,避免只是視覺相似造成的誤判
loop_detected, loop_kf_idx = False, -1
if des2 is not None and len(kp2) >= 20 and len(keyframes) > recent_ignore:
    for kf in keyframes[:-recent_ignore]:            # 跳過最近的關鍵影格,避免瑣碎匹配
        matches_kf = bf.knnMatch(kf['des'], des2, k=2)
        good_kf = [m for m, n in matches_kf if m.distance < 0.75 * n.distance]

        if len(good_kf) >= 40:
            pts_db  = np.float32([kf['kp'][m.queryIdx].pt for m in good_kf]).reshape(-1,1,2)
            pts_cur = np.float32([kp2[m.trainIdx].pt for m in good_kf]).reshape(-1,1,2)
            H, mask_H = cv.findHomography(pts_db, pts_cur, cv.RANSAC, 3.0)

            if mask_H is not None and np.count_nonzero(mask_H) >= loop_inlier_thresh:
                loop_detected, loop_kf_idx = True, kf['idx']
                break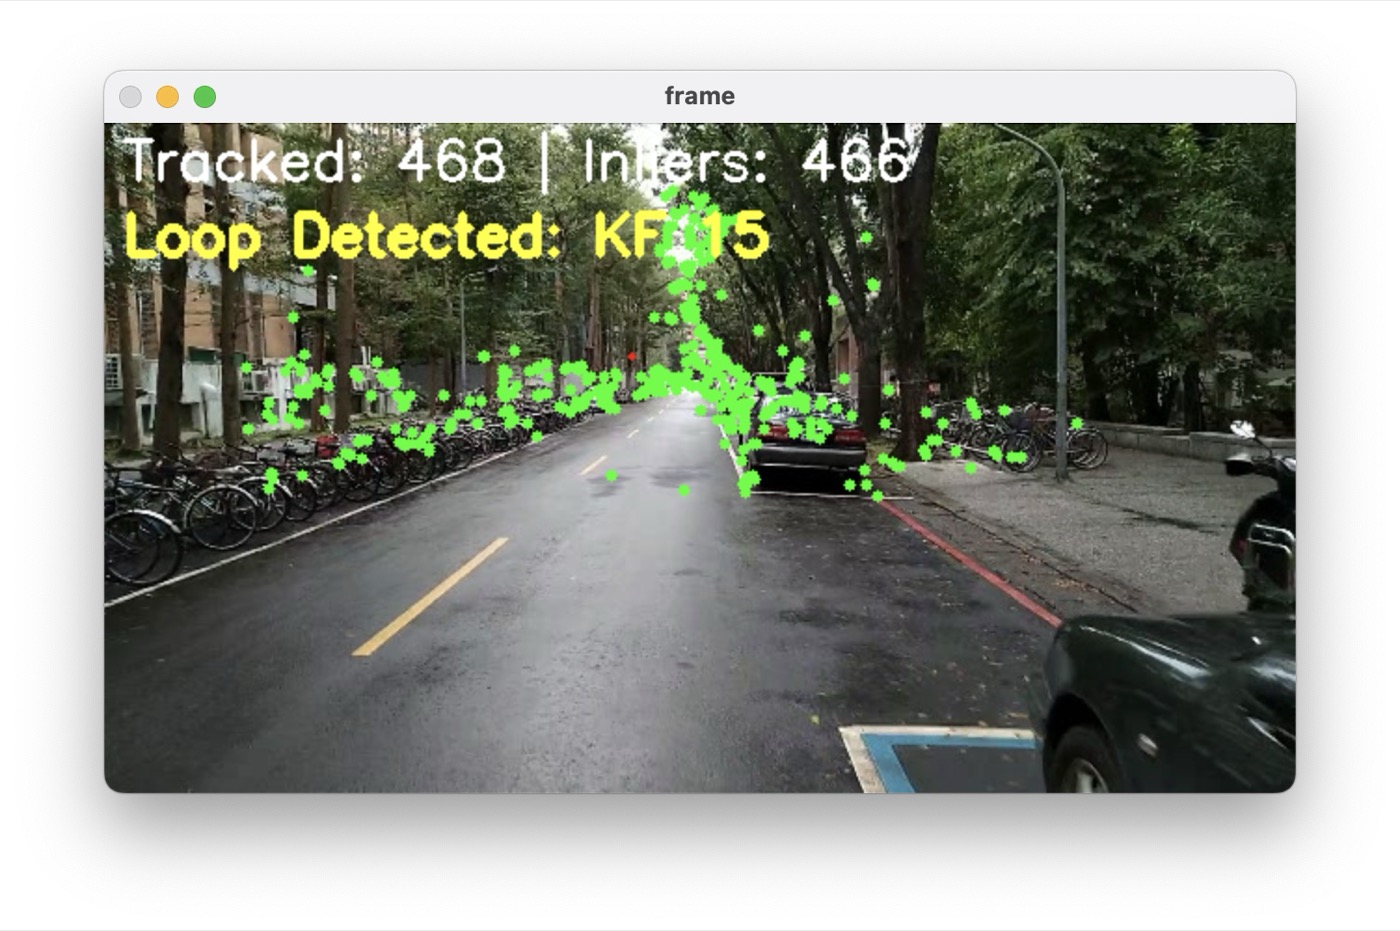
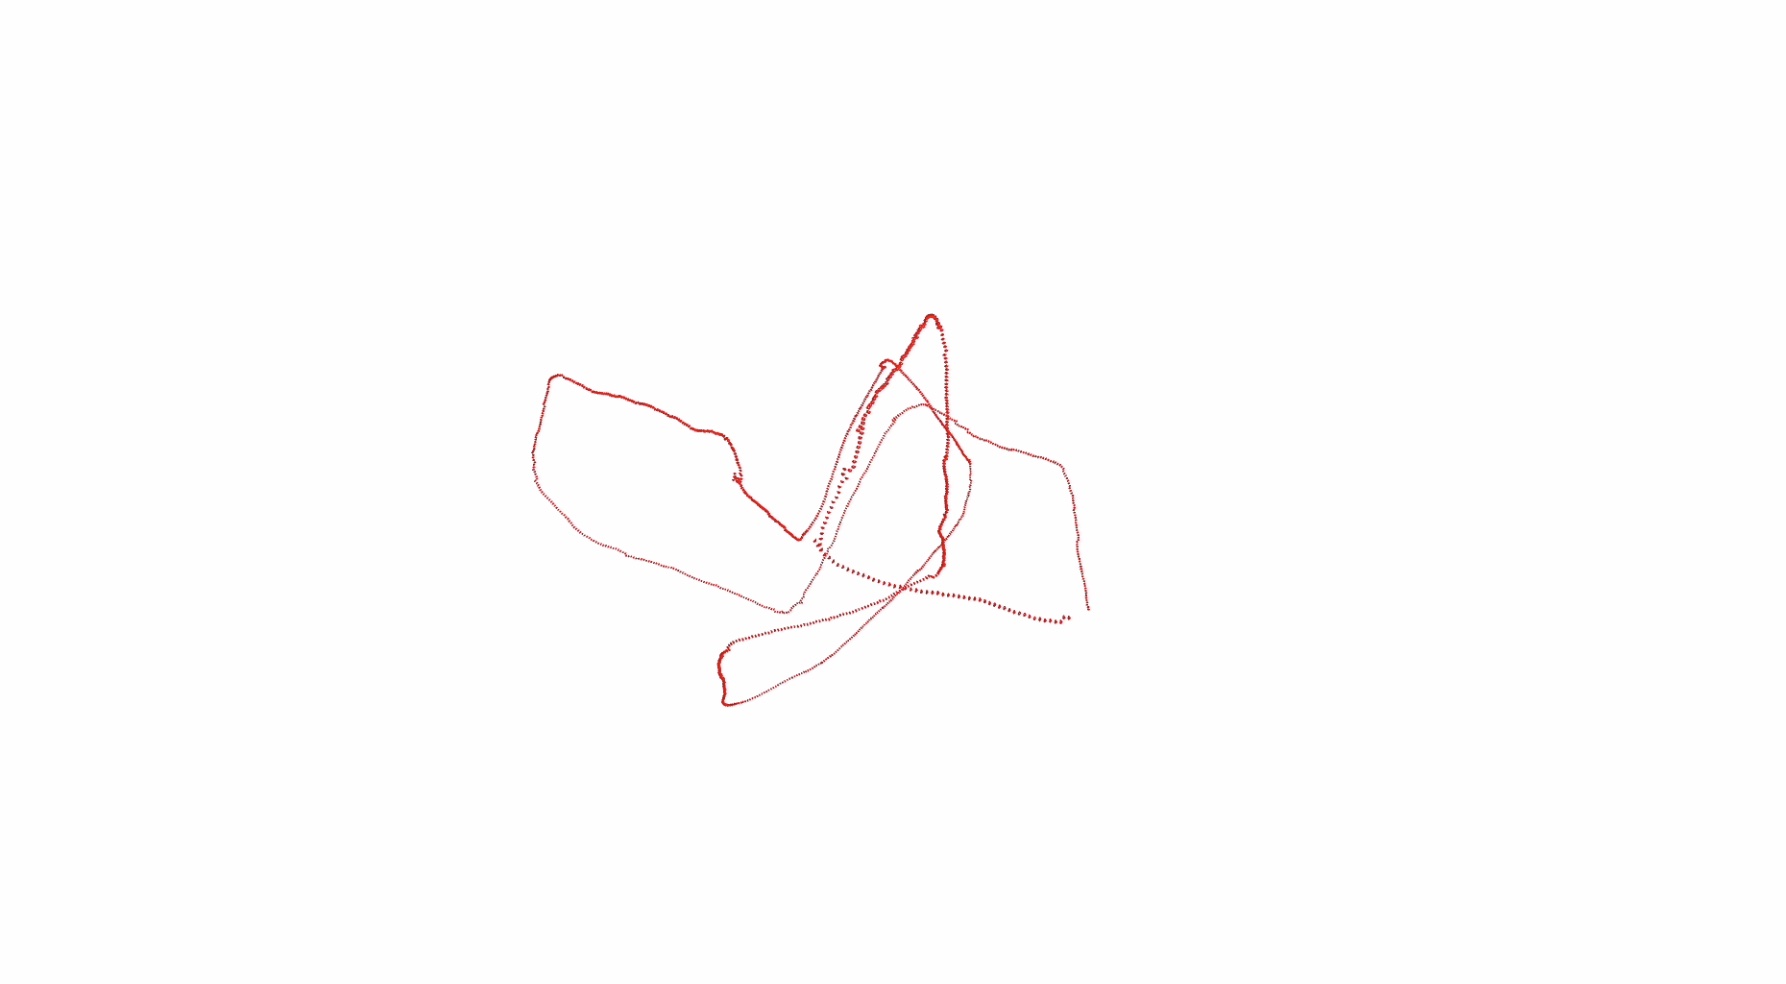
學到的事:單目 VO 沒有尺度資訊(scale ambiguity),純靠逐幀姿態累積, 軌跡會隨著幀數增加持續漂移(drift)——Case 2 起點與終點對不齊就是證據。 Loop detection 提供了「回到同一個地方」的訊號,是後續做 pose graph 優化 校正漂移的前提;手刻 Essential Matrix 和 recoverPose 也讓我更清楚 OpenCV 那幾行函式呼叫背後,藏著整套對極幾何與三角化的數學。